Near Field Transfer (NFT) cards have long been the standard in Japan for paying for train tickets, bus tickets, drinks from drink machines, things from convenience stores, shirts, movie tickets, you name it! Cards were easy to get: you just go to the train station, pay a 500-yen fee, and get a card! Some machines would even let you customize your card! But thanks to COVID and various chip shortages, these cards now come at a premium. The most popular cards, such as Suica and PASMO were discontinued recently because they simply had too much trouble making them anymore. This is especially frustrating for visitors and new residents who never got the opportunity to get an NFT card in the first place.
But we have good news! If you have a smartphone then you don’t need to hunt down a plastic card – you probably already have one in your pocket: It’s your Apple or Android phone. You can virtually add Suica to your Apple Wallet or Android phone and make traveling as easy as tapping your device on the terminal when you want a ride. Here’s how to get set up in no time:

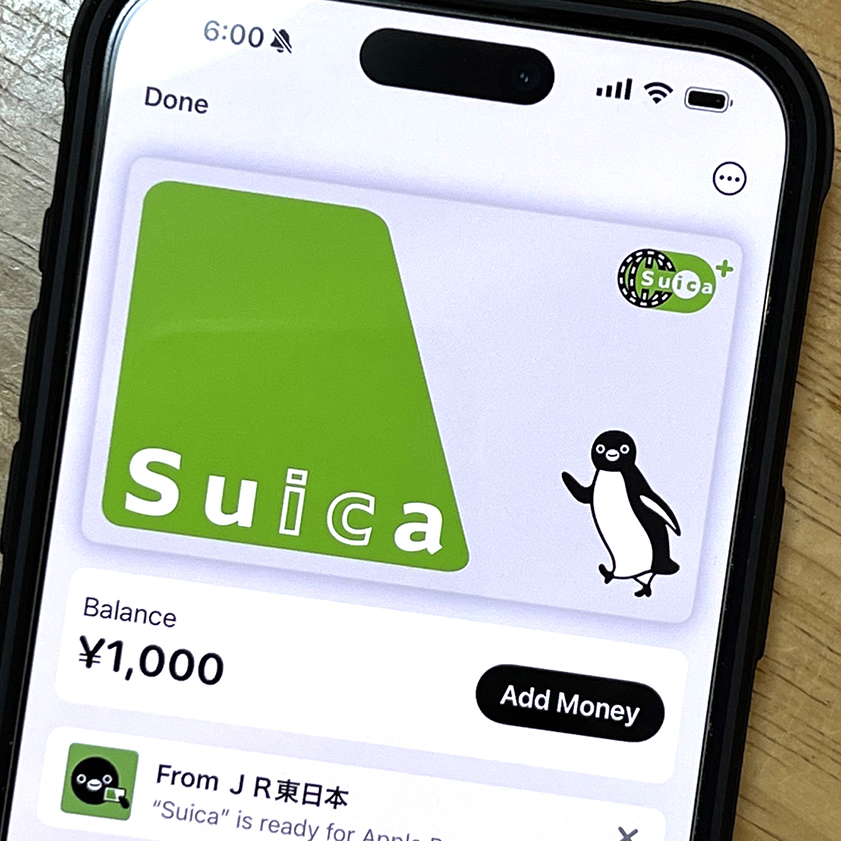
APPLE IPHONE
1. Open Your Apple Wallet App – Find it on your home screen or in the App Library.
2. Tap the “+” Sign – It’s usually in the upper right corner. This is how you add a new card.
3. Select “Suica” from the List – If you don’t see it, make sure your region is set to Japan; this can be changed in your iPhone settings.
4. Choose “Transfer Existing Card” – If you already have a physical Suica card. Or, you can create a new Suica card directly in the app if you don’t have one. Note: Transferring will deactivate the physical card.
5. Follow the On-Screen Instructions – You’ll either enter the information from your existing Suica card or set up a new one by adding money from your credit or debit card.
6. Add Money to Your Suica – Once your card is set up, you can add funds anytime directly through the Wallet app.
7. You’re Set! – Now you can simply hold your iPhone near the ticket gate readers with your finger on Touch ID or double-click the side button for Face ID devices. No more digging for your card. Travel made easy!

ANDROID PHONE
1. Download Mobile Suica App – First things first, head over to the Google Play Store and download the “Mobile Suica” app. This app is your ticket (literally) to easy travel.
2. Create Your Account – Open the app and follow the prompts to create a new account. You’ll need to input some basic information, so have your details ready.
3. Add Suica to Your App – Once your account is set up, you can either transfer an existing physical Suica card to the app or create a new digital Suica card right there. If you’re transferring a physical card, remember, it will deactivate the card.
4. Load Your Suica – Time to put some money on your Suica. You can do this via credit card, debit card, or bank transfer directly through the Mobile Suica app.
5. Activate Suica on Your Phone – With money on your card, you’re almost there. Make sure your phone’s NFC is turned on; this allows your phone to communicate with the ticket gate readers.
6. Ready, Set, Travel! – Now, when you approach a ticket gate, simply wake your phone and hold it near the card reader. No need to open the app; it works right from lock screen!

iPhones need to be iPhone 8 or later and running the latest iOS version. This also works with Apple Watch as well. Android phones need to be NFC-enabled and running on a compatible version of Android OS.
Remember, this digital travel solution isn’t limited to Suica. There is the option to use other virtual NFC cards as well! Once you’ve got yours set up, you can use it for trains, busses, vending machines… the skies the limit! You can even quickly recharge on the go directly from your virtual wallet or bank account. How easy is that!

Leave a comment